Thursday, January 10, 2019

Head and cleaning.

Evening folks,

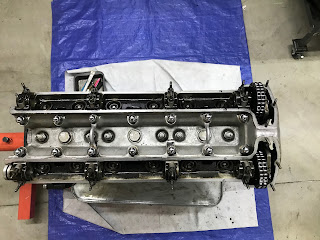
Picked up the head from the machinist today, I'm really impressed with how fast the turnaround was but was concerned that they said they had to remove 0.019" from the head to get rid of the warp.  I was concerned that this would alter the alignment of the cams but after talking with my experts today the consensus was that it would be OK.  Several of my reference sources agreed with Des Hammil's book suggesting that 0.060 could be removed without ill effect.  My secondary concern was that this could throw the camshafts out of alignment but after checking the alignment with my straight edge I'm comfortable that they were well under the maximum.

Still waiting for the flywheel to be finished but am waiting for parts so not a major concern yet.  This allows me to take a little time to clean parts for the eventual reassembly.

The resurfaced head

Disassembled the idler pulley assembly and greased the bearings, the alternator has been cleaned in anticipation of disassembly and refurbishment.
The block, ready for painting, almost ;-)


Not much else to report, placed an order with SNG today and with Coventry West for the gaskets we'll need.

Cheers,
Lynn

3.5 hrs

Wednesday, January 9, 2019

Interviewing Machine Shops

Not a very interesting day, took the head down to the machine shop that I used to use and talked with the machinist's.  They seemed to be comfortable with skimming the head for us and felt that it needed to be done given the slight warp/sway the head had.  I'm assuming they will be able to tell me how much they will have to remove and I'm anticipating it being a fairly thin skim-hope I'm right.

After leaving the head with them I took the flywheel and new pressure plate to another shop to get the flywheel surfaced and balanced with the new pressure plate.  Believe it or not this took up most of my morning.

Then this afternoon I was busy researching and preparing parts orders,  SNG has been my primary supplier and continues to be so but I'm going to have to find another vendor for the head gasket as I want a 'Cometic' brand head gasket (which has the best reputation for this critical piece).  I also ordered a pint of POR15 gloss black engine paint for the engine block.

One little addendum, the machine shop tested the head/valves with a device that puts a vacuum on the hemispherical chambers in the head to test the seal of the valves- Jennifer's passed with flying colors!

Cheers,
Lynn


2 hrs

Tuesday, January 8, 2019

Cleaning head and 'new' camshaft sprockets

Hi Folks,

Did a little more cleaning on the head and installed 'new' camshaft sprockets.  Spent a bit of time on the phone and email to get a feel for what the maximum warpage allowed without having to skim the mating surfaces and thus far haven't been able to find any firm answers.  My inclination is to avoid the hazards of getting it machined and use a Cometic brand head gasket which is supposed to be superior to the OEM gasket, but this approach  may not seal and I'll be redoing the head with it in the car.  I think Jennifer is going to have to help me with this decision.
My version of a 'leak down' test-passed with flying colors

Looking good enough to install?

Better cam sprocket design with finer serration's and solid plate 

New vs Old, The old version is thought to be weaker than the one on the left  and should be a good improvement


Tomorrow will need to prepare an order for SNG and make a decision on skim vs non skim.

Cheers,
Lynn


4 hrs

Monday, January 7, 2019

She's Come Undone, off with her head!

Spent a little time Saturday getting Jennifer's Jag ready for the head to be removed so today was the big day!  What were we going to see?

After removing the cam oil feed line and the 6 nuts at the front of the head that attach it to the timing cover I was ready to undo the head bolts.  Turning the nuts 1/4 turn at a time starting at the center and going out in a centripetal manner the nuts were all removed then expecting a great deal of difficulty started trying to lift the head off.  Much to my surprise it came off relatively easy lifting each end just a bit (to avoid binding) I got it up about an inch and then lifted it off. 

The head and block look to be in very good condition however I think that the coolant leakage was coming from the head gasket as there is 'staining' on either side. 
Cams removed and shims measured 

Tappets and shims laid out in order

Cams

Top of the block after removing the head and studs

Head

Another shot of the head, cleaned up and ready to measure for warpage

Measurement revealed 0.003" 'sag'  and about 0.004" warp in the y-y' plane with a bit less in the x-x' direction.
I think this may be within acceptable limits but will need to do some research


Picture of the cam sprockets showing why they are often replaced,  this version of the sprocket was reportedly prone to failure because of the cut out design.  Earlier and later versions had a solid center piece with more teeth.  I'll try to find a picture of the better ones and post it later.

 At this point I need to do some research and find out what the max. tolerance is for warpage and plan from there.  The head and block look to be in very good condition suggesting that this car received good care over the years with frequent coolant changes.

That's all for now.

Cheers,
Lynn


6 hrs.


Friday, January 4, 2019

Short Day, short blog-Mounting the engine

Hi Everyone,

Today was a short day because the morning was chopped up picking up parts and pieces.  The drive shaft was done so picked it up and I needed to pick up some more Redline MT90 for the transmission.  I considered reusing the transmission fluid but that seems like false economy to me and since I'm replacing the seals front and rear on the transmission don't have much choice.

This afternoon I mounted the engine on the engine stand which makes it much more accessible, by the time I got it mounted it was getting towards the end of the day and I want to be 'fresh' when I start pulling the head.

I still need to go through my parts to see if I have the camshaft sprockets that I can replace old ones with.
'New drive shaft'  This piece should be serviced anytime the engine is out because it can't be removed without either dropping the engine or the rear suspension.


Well, that's it for this week, stay tuned for next weeks exciting adventure "Off with her head"!

Cheers,
Lynn


3 hrs

Thursday, January 3, 2019

Checking the valve clearance and more cleaning

I was hoping to get the engine mounted on the engine rack today but felt like I needed to continue getting the layers of grease and dirt off the engine and head before I disassemble the head.  I checked the valve clearances today to have a baseline for adjustment during the reassembly process and a couple of the things I'm going to look at a during reassembly are the tappet bucket hold down kits and replacing her camshaft sprockets.  Her car appears to be one of the cars that came with the 2 bolt 'cut out' sprockets that are discussed in this article: http://www.georgiajag.com/Documents/Camshafts.html 
Apparently Jaguar had issues with these cam sprockets and quickly changed the design, the hold downs are strongly recommended by those in the know to keep the buckets seated, with age/time the buckets will creep out and when they do the cam lobes start hitting them.

Nice and purdy 

Checking the clearances on the valves

Water passages look really nice IMHO

This freeze out plug has corrosion around the edges and was likely contributing to the coolant leak, this is on the exhaust side of the engine

Ready to mount it to the engine stand 

Sorry this is sideways but the clearance readings are out of spec.  The intake "I" should be 4 thousandths and the exhausts should be 6 and they will have to be adjusted.
Well that's it for today, tomorrow I hope to have the head off.

Cheers,
Lynn

6 hrs

Wednesday, January 2, 2019

Removing Transmission

Happy New Year to you all! 

I've resumed working on Jennifer's car and have a plan in mind.  When I started on this project the plan was to just replace the clutch however as I started stripping the engine down it became apparent that 'CD' had a significant issue with coolant leaking from the interface between the head and block of the engine.

The current plan having discussed it with my friends and with Dick Maury of Coventry West (thanks Dick!) is to pull the head, get it skimmed and use a Cometic Head Gasket with the hope that this will seal it up.  I'll also pull all the 'freeze out' plugs and replace them, If we find that the head is warped then this option might be off the table so we're keeping our fingers crossed.

Getting back to reason that we started on this process I discovered the reason that I had to adjust all the play out of the clutch slave cylinder,  the throwout bearing was worn all the way off and into the metal (pictures below).  That combined with the heavily worn clutch plate eliminated any ability to adjust it further,  it wasn't long till it would have caused damage.
New clutch kit, took a long time for the supplier to get them back in stock

Clutch plate

New pressure plate

Vacant engine bay 
There it is, been cleaning the accumulated years of crud off the engine


Looking a little better


First look at the throw out bearing which actuates the clutch, below you'll see a picture of new and old side by side

Transmission split off the back of the engine


Hopefully you can see the difference between the old one and the new one at the back.

That's all for today, tomorrow I'll continue the cleaning but hope to check the valve clearances and then pull the head.  Once that's done then I'll have to start interviewing machine shops to get the flywheel turned and the head skimmed.

Cheers,
Lynn

5 Hrs