Tuesday, May 8, 2018

Removal of Brake Master, etc....


Greetings and salutations,

Started the morning with evaluation of the removed master cylinders. The servo master cylinder had over a quart of brake fluid in both sides-this tells one that the servo's seals were shot allowing fluid into the vacuum reservoir and that the diaphragm has failed allowing the fluid into the other side of the diaphragm. Reminds me of my 'first' restoration many years ago when my wife to be bought a 1971 BMW 2002,  the seller assured us that the car would be great to drive up to Bogus Basin (local ski resort).  Well, driving it home it would put out a truly massive cloud of white smoke every time I tried to stop and the only way I could stop the car was to put my foot out the door, even the parking brake was shot!  Needless to say it had the same problem with the vacuum booster and would suck brake fluid into the engine when I tried to use the brakes-it was pretty funny to see folks back off from us at stop lights.


Nasty fluid from vacuum booster

Vacant area where the heater box sat, also removed the pedal box in anticipation of replacing the springs
 Having had so much fun with DIRTY stuff I decided to do a little bit of interior stuff, I'll try to be keeping as much stuff original by shifting the vinyl around to hide tears and wear spots.
Odd oval speaker in radio speaker housing, it kept the radio console from fitting correctly by interfering with the surrounding console and radio.

The radio, most radios were installed by the dealer at the time of purchase and this appears to be period correct.

Cleaned up console front, needed to glue it down but really looks pretty nice.

This is the rest of the console and as shown below it needed to have the vinyl glued back down to the metal frame.


The aperture seal for the hand brake needs replacing

Gouge in the side of the console, will glue it down and it should be hard to see. Undoubtably damaged by the seat rubbing against it.

This is the center cubby, the top was loose because the screws were stripped out so will fix that, the vinyl has been removed so that I can reposition it to hide the tears.

Just another shot of the pristine rust free floors!

The cleaned up radio console with vintage radio.


Well that's it for today, sent in an order to SNG Barrett for some parts, I think they should put you on their Christmas Card list Jennifer :-)

Cheers,
Lynn

7 hrs

Monday, May 7, 2018

Brake & Clutch master cylinders


Evening folks,

Today I spent the afternoon removing the brake master, clutch master and servo master cylinder.
I've been wondering what I would discover since Jennifer said her brakes felt soft after having them serviced recently, well tomorrow I'll do the 'autopsy' but thus far I found the servo master cylinder vacuum booster full of brake fluid, gooey residue around both the Brake master cylinder and the clutch master cylinder, and lastly the clutch return spring is broken.  The pictures below will describe the events of the day.  

Brake servo master cylinder and vacuum booster in the center of the picture, pan below and heater fan motor above

looking down on the brake and clutch master cylinders

Had to remove  the splash pan behind the wheel to gain access to the servo master cylinder, will clean this up and paint.

Panel from a different angle

Opened up for access.


Notice the white goop on the rubber sleeve of the master cylinder

Took this picture to show how much leakage around the mounts of the cylinders, upper area, brownish colored stuff

Removed and draining waiting for the autopsy tomorrow.

Well, that's it for today.  Will get and order off to SNG Barrett tomorrow and see what we've got here.  My initial impression is that they are pretty rough and need to be replaced. 

Cheers,
Lynn

3 hrs

Friday, May 4, 2018

Passenger side seat

Afternoon Ya'll,

Worked on the passenger seat today, I think it came out pretty good if I do say so myself.  Priced getting the master cylinders for the brakes (2) and clutch (1) rebuilt from Apple Hydraulics,  there is a definite 'Jaguar' tax on this stuff but the price will be a bit more with new and I think we should try to keep the originals and I have had good results with A.H..

Hardura under the seats, cleaned up pretty well.

Gluing the cover to the foam bottom with contact cement

Finished seat


That's it for this week, will pull the brake master cylinders and clutch master cylinder next week and get them off to Apple Hydraulics, takes them a week to sleeve them and rebuild them.  While I'm at it will pull the heater box off and get it cleaned up.  The coolant hoses look pretty rough so will replace them while I'm working on the firewall.
Cheers,
Lynn


4 hrs

Thursday, May 3, 2018

Getting to the bottom of it '3' Seats

 Evening,
Worked on the drivers seat today and a few other details.
The drivers side 'squab' vs the original on the left (hope that's obvious ;-)

Seat back sans cover, the rubber lumbar strap was broken and I was able to fix it.


the seat ratchet mechanism, needed cleaning and paint  

The new seat, should be a little bit more comfortable

New foam and diaphragm, cleaned and lubricated tracks
The carpet is worn where the seat mechanism has been rubbing against it, since we are trying to keep the car as original as possible I have flipped them side to side hiding the damage under the seat.

Pristine floors with no evidence of the four letter word....

That's it for today, will clean up the hardura under the seats and get the 'new' drivers side seat installed, hoping to get the passenger seat done too-stay tuned.

Cheers,
Lynn


6 hrs

Wednesday, May 2, 2018

Getting to the bottom of it '2 '(seats).

Evening Folks,
After getting the carb's back on Pearle I was able to free up some space to start on CD's seats.  The seat bottoms were beyond repair, if it had just been the thread in the seams I would have tried to save them but the leather was worn through so we decided to get new covers.  The foam appeared to be original and interestingly the cover was glued to the foam along the center portion.  The reason I mention this is that this has been a small point of contention on the JL forum in the past with some folks saying that they were not glued etc.  I will use 'lasts' to hold the seat cover in the 'groove' in addition to contact cement, this has worked very well on mine and it was a tip I picked up from one of my auto upholstery books.

Seat being readied for disassembly 

Seat latch mechanism, this car is 698 cars later than mine which doesn't have a locking mechanism.  We will want to get new covers for this, the originals are plastic and quite frail however the S3 cars had a similar mechanism with a metal cover plate.  I have been lead to believe that the metal ones will fit on the same way with a little modification so may check them out depending on the cost difference.


Worn out seat cover

Old foam, has started to decay

Pealing the cover off the foam and seat frame.


Old foam, the stories it could tell ;-)

Making a 'last' which will hold the cover into the corners, the yarn goes through the edge of the cover at the corner and is drawn through the foam, then it's secured underneath with a 'button' to prevent it from being pulled through.

Seat frame with diaphragm, will glue the foam as per original to the edge of the frame, you can see the 'lasts' in place before the foam is flipped over and glued in place.


Well that's it for tonight, tomorrow will finish up the seat bottom then move on to the back rest.

Cheers,
Lynn


3 hrs


Tuesday, May 1, 2018

Boot lid and Miscellaneous little things


Good evening,
Today I decided to start with a few little things and build up too a bigger and more challenging task, the boot lid springs.  Starting with the bonnet bumpers and latches I decided to adjust the bonnet.  It was slightly misaligned so while I was replacing the little bumpers I thought I might try to adjust it a little bit better.  It took a little while but I think it helped quite a lot.  Then I decided to put the new brake and clutch pedal pads on, I think that's a little better too.

Then on to the big job for the day, removing the boot lid (trunk in American), and taking off the hinges on either side.  Several of the springs were broken and the lid hung at half mast all the time so I charged forth, I had forgotten what a miserable little chore this was!  Reviewing my notes from previous times made it sound quite simple, Oh well, the old saying about fools going where angels fear to thread seemed to apply today but once committed no turning back;-) 


I think this looks a little nicer and is probably a bit safer, less likely for ones foot to slip off the pedal

Disassembling the interior of the boot to get to the nuts and bolts holding the hinges in place. I scribed around the mounts to aid in relocating the boot lid when done. 

A little discovery, their has been a little body work done back by the drivers side tail light and you can see where they drilled holes in the skin to pull the section out and then filled with filler (little brown 'worms' hanging down behind the filler hose).

The drivers side hinge with several broken springs.

New springs getting 'threaded' onto the awl, next will pull it over the end and repeat 4 more times wearing gloves as they are quite sharp.

Getting ready to transfer them to the hinge where they will be fastened on the the hinge.

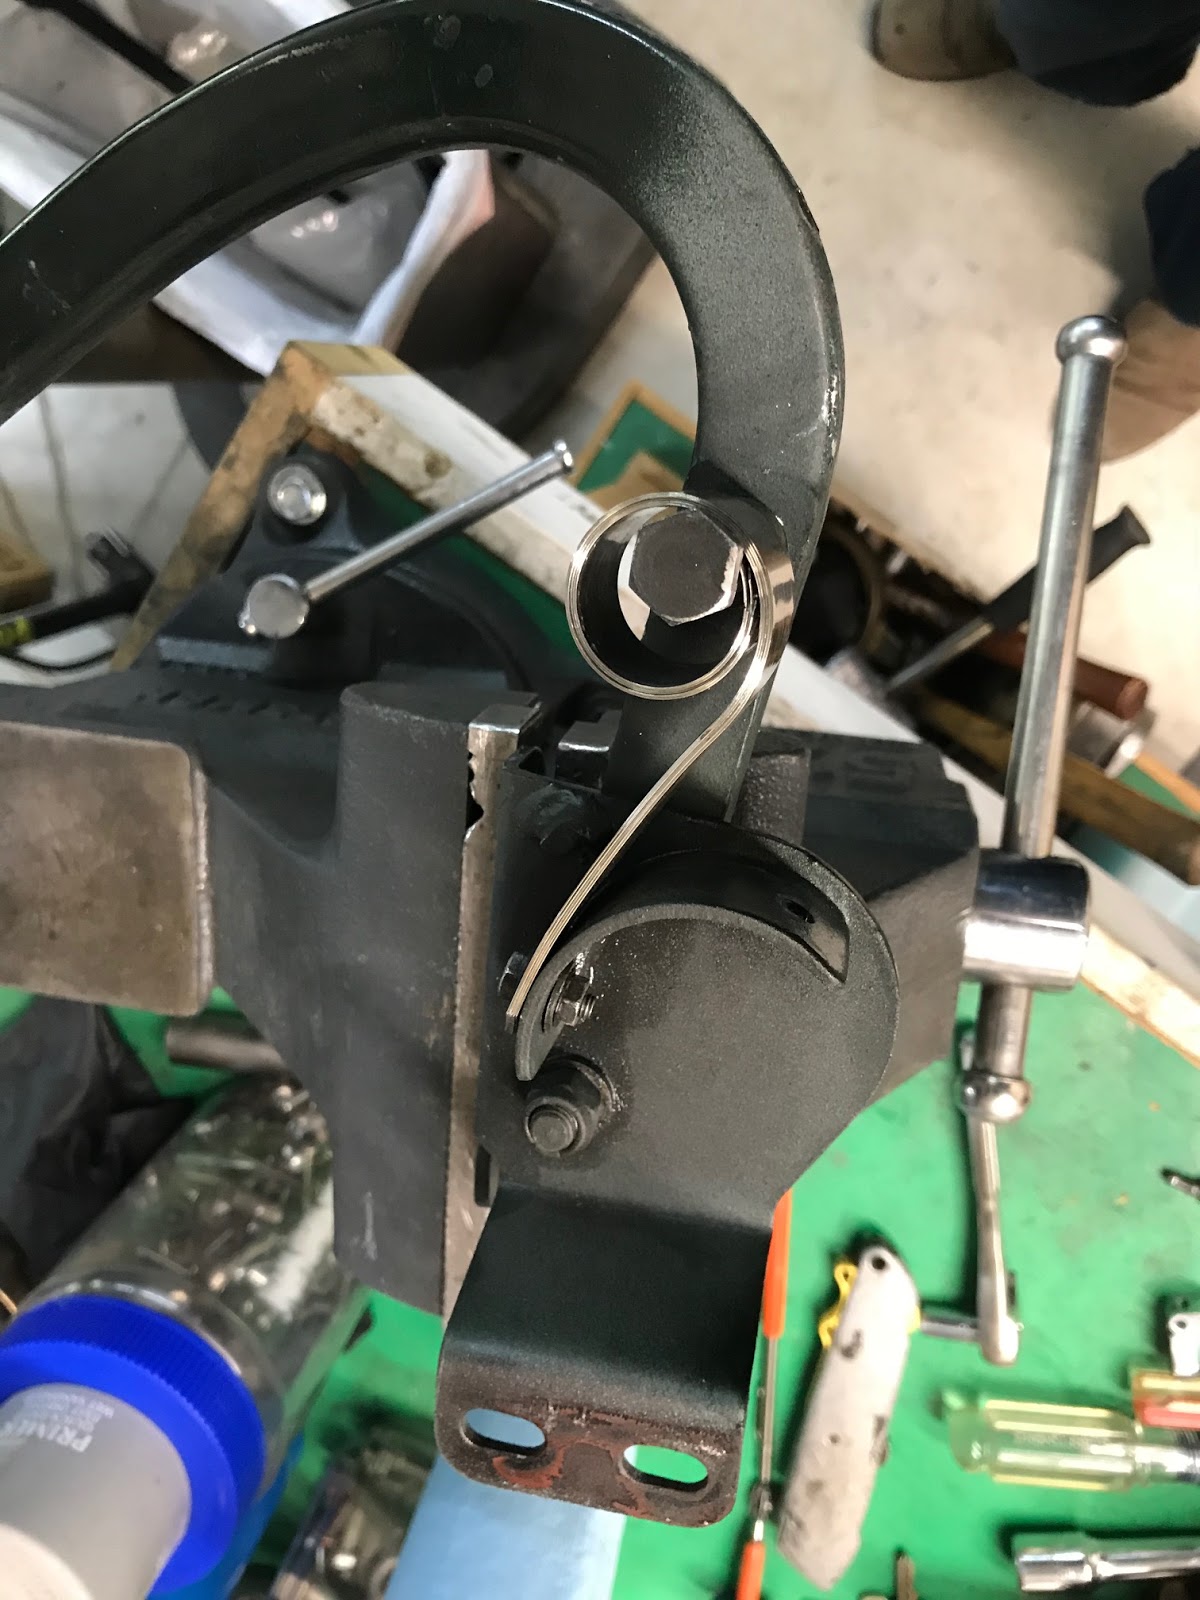
After much gnashing of teeth they are wrapped around the pin on the hinge. 

Hinge back in place then on to the other side, with Jan's help to stabilize the boot lid I was able to get it back in position and bolted on.  I works much better.

I will start on the seats soon but had to clear out some work space late this afternoon.  I had been waiting for some parts for my V12 to finish a project on it, I had rebuilt the carbs last month in preparation for the driving season so I needed to get that stuff out of the way before I start disassembling the seats.

Thats's all for now, hopefully I'll get some time in on the seats tomorrow, stay tuned.

Cheers,
Lynn


7 hours